Monday, February 25, 2013

The Great Kentucky Agate Hunt - Part 2


For More Jewelry Tips, Information and Projects,Visit Us Online

In Part 1 of The Great Kentucky Agate Hunt, we set off on a hike up a creek in Eastern Kentucky. After hours of trudging through this beautiful country we have found nothing. The question remains, will we find what we are looking for? Our saga continues.

Trekking through the cool knee deep waters we discovered the beauty of springtime in eastern Kentucky. The terrain of the creek bed changed from gravel and stone, to a smooth black slate. It looked as if the creek bed had been paved. These areas of large slate formations looked like marble flooring found in mansions of the rich and famous. Although beautiful these formations were a bad sign for us. The treasure that we were looking for is rarely found in areas such as this.  Wasting no time Roland left the creek and bypassed the area for more fertile hunting grounds. Within minutes we were back on the hunt in rich, rocky territory. 
The creekbed changed
 
Hour by hour passed, mile by mile of stone examination and Roland calling my attempted finds as "junk" was beginning to wear on me. After each rejection he would toss them back into the rock bed like he was throwing away an empty potato chip bag. I was beginning to wonder, “Would my journey end on a high note?” It sure felt like my adventure wouldn't end with a triumphant catch. As fast as those feelings of leaving here empty handed came, they quickly fell to the way side. "There's one right there," Roland calmly reported. We found it! We found our treasure! As I picked up the stone I quickly realized just how different it was from the hundreds I had presented for approval. I could feel the excitement wrap me in its electrifying embrace. I then felt something come over me. It was a feeling that I had never felt before. I could feel my eyes glow with agate fever. We had finally done it!

Success!
 
There was only one problem facing us – the long walk back to the car. Over the last three hours or so we covered almost two miles of territory. The walk back would be a test of my endurance and stamina. Not only was it a long walk wearing hip waders, I had to do it carrying my treasure. Take my word for it, after hours of hiking, these stones felt twice as heavy as they were.
The Long Walk Home
 
 
The hunt was a success! I could now leave this beautiful landscape with the knowledge that I had prevailed over this elusive opponent.  Even though they weren't what I was looking for, I found a lot of different goodies that day. The education that was imparted to me by my hunting guide Roland was only the beginning of my love affair with Kentucky agate hunting.

For More Jewelry Tips, Information and Projects,Visit Us Online

Monday, February 18, 2013

The Great Kentucky Agate Hunt - Part 1

For More Jewelry Tips, Information and Projects,Visit Us Online

Not too long ago I had the occasion to go on a hunt for Kentucky Agate with my family. My son, Robert and I, wrote this wonderful article that was printed in my now out of print magazine "Wire Art". I loved the trip so much that I wanted to share our adventure with all of you again. Are you ready? Here we go.


The blue sky blanketed over the green hillsides as the clear rocky creek cut it in two. The still quiet air filled our lungs as we head out on our adventurous hunt for the ever beautiful, ever elusive Kentucky Agate.

The adventure begins as I first meet up with my guide and master agate hunter Roland McIntosh at his workshop that lies at the foot of his hillside home. Roland is by far one of the nicest people you’ll ever meet. His ‘down home’ country demeanor makes you feel welcomed. From the beginning it felt like we were long lost friends reuniting after years apart. His humble manner and easygoing attitude immediately set me at ease.

Our Guide, Roland McIntosh

After pleasantries and introductions he gave me the grand tour of his workshop.  Looking around the outside of his shop I witnessed the largest collection of Kentucky agate that I’ve ever seen. There were piles upon piles of geodes all around his building. The stockpile of agate was almost unimaginable.  At the time I didn't realize it, but this was very beneficial to see, for now I have a slight clue as to what we were searching for.


Roland, whose knowledge about this beautiful stone is seemingly unmatched, has been hunting this rare stone for over 27 years. In that time, he’s had to self-educate himself about Kentucky agates, gleaning as much information as he could from fellow hunters. Kentucky Agate is only found in a small region of Eastern Kentucky. It ranges in color from brilliant red, orange, yellow, and burgundy to subtle pastels of lavender, pink, and green. Roland pointed out that out of all of the color combinations that the stone is found in, the rarest is red and black. This, however, was the inside of the specimen. What makes finding Kentucky Agate so difficult is differentiating it from other stone. In many cases it looks like everything else in the creek bed. Roland turned a specimen over and pointed out how to identify the treasure we were looking for. I needed to keep my eye out for a large, egg-shaped stone with a tan to brown exterior. I spent a few minutes studying the target that he and I would be searching for. The education that I received from this mineral hunting sage was priceless. The more he spoke, the more excited I got.

 
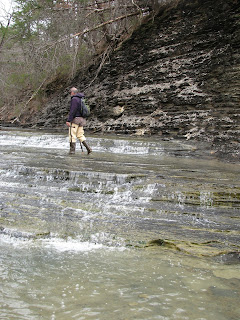
Once the lesson concluded, we started our trek through the hills of Kentucky. Gorgeous hills and valleys fill our eyes and the blue sky covers our heads as we walked over to the hunting grounds armed with our wits, sharp eyesight, and a bag to hold our catch. We headed up a creek that Roland has hunted from previously and knew well. Even though he's been there before, the rains and other storms that hit a few days before kicked up new stones for us to find and explore.
 
As we walked upstream, thoughts of the treasures that we'd find filled my head. Shortly after the hunt began we encountered our first signs of wild life. The creek we were exploring ran through a pasture where a quiet herd of cows were hungrily feeding on fresh grass. Roland seemed unaffected by their presence as he climbed the pasture gate. “I’m not worried about the cows”, he said with a grin, “I’m looking for the bull”.  This statement heightened my concern about what we would encounter the deeper into the creek we explored. I took a deep breath, said a quick prayer, and made my way over the gate. Thankfully, no bull was present.

The "Dangerous" Wildlife

Without a doubt the one thing that helped me on the journey was Roland. His accurate and vast knowledge of the area and different stones proved to be quite an asset. His easy going nature came in handy as well. Throughout the entire trek I kept picking up stone after stone, rock after rock, bringing it to my hunting guide for approval, not one of them being the correct stone. I must have picked up the entire creek bed and brought it to him for inspection. With each specimen that I presented to him he would nonchalantly say, “That’s junk”. His disapproval at first was hard to take, but after the first fifty rejections it almost became a joke. It was a good thing Roland doesn't frustrate easily. If not for him I think I would have left the creek with five tons of flint and iron ore. It seemed as if the creek was dominated by these imposters, making it difficult and tiresome to find our treasure. But like any good treasure hunt - the harder the work the better the pay off.  This hunt would have been much easier if we had a pirates treasure map with a huge “X” marking the spot. But all we had is a very very long hike and a lot of time. Hiking through the creek, you felt as if you would never find your treasure. Stone after stone, bend after bend, and no sign of the agate.
"That's Junk"
 
Will we ever find our treasure? Tune in next week for the exciting conclusion of "The Great Kentucky Agate Hunt!"
 
For More Jewelry Tips, Information and Projects,Visit Us Online

Monday, February 11, 2013

How To...Come Up with Fresh Designs

For More Jewelry Tips, Information and Projects,Visit Us Online

Coming up with new and exciting designs is essential for artists to successfully sell their work. If you’re not selling you’re not eating and not eating is a bad situation.  The problem for many artists is tackling the daunting task of changing their tried and true designs to come up with a fresh new look.  So why make the change? In 1909 automotive pioneer Henry Ford was quoted as saying about the Model T, “Any customer can have a car painted any color that he wants so long as it is black”. Any idea why you can buy a car in a wide array of colors today? Competition. Years after making that statement Ford realized that if they wanted to stay ahead of the competition they had to make fresh changes to their product. The same idea is true with wire art.  If you keep making the same thing year after year eventually people will begin looking at the competition. To stay ahead of your competition it’s extremely important to give your work an updated look.
So how do you come up with a fresh new look to your pieces? Chinese philosopher Lao-tzu said “A journey of a thousand miles begins with a single step”. That’s a great way to view the monumental task of updating basic projects. The first steps in our design journey begin simply with a pencil and a blank piece of paper.

Before you begin sketching you need to define what you’re making. If you don’t define the project you’ll have no direction. One of the first projects most wire artists learn is a basic pendant. So for this first exercise we’ll update a basic wire wrap pendant.
Choose a stone to work with and place it on a blank piece of paper. With a pencil trace the shape of the stone (Picture 1). Remove the stone from the paper and have a look at what you’ve drawn. Congratulations, you’ve just taken the first step to giving your work a whole new look.

Picture 1

Every wire wrapped pendant has necessary elements that must be added to the piece for stability. Every pendant has to have a bail, wire strands must be brought over the front and back of the stone to secure it in place, and all of the wire strands have to be wrapped together. These elements can’t be omitted, but they can be modified.  Before making any changes to these design elements lightly draw them on the sketch just as they would appear in a finished piece (Picture 2). 
Picture 2
 
Now comes the fun part, making some changes. When I’m looking for new design ideas I spend a bit of time looking for designinspiration in magazines, the internet, and Pinterest. I look at all of the jewelry that the models are wearing and take note of the new trends that are on the horizon. One thing I’ve noticed about pendants is their size. Big stones are in. I’ve also noticed that the more “doo-dads” that you have on the pendant the more people love it. So we’ll go with that trend.

We first need to devise a way to add additional stones or metal to the basic pendant. A good way to do this is to add eyelets to the wire frame. These eyelets will allow you to hang design elements from the pendant.  Begin by drawing a small eyelet at the bottom of the pendant (Picture 3).
Picture 3
 
To take this design a little further draw in two more eyelets on either side of the first one (Picture 4). From these three small design elements you can take the piece in an untold number of directions. You could flatten and texture a few pieces of large gauge wire and hang them from each eyelet. Several beads could be strung and suspended from the eyelets. You can even add a couple more eyelets and have a ton of places to add design elements. The possibilities are endless.
Picture 4
 
Once you’re satisfied with the design the next step is to define the details. This step shows how each new design element fits into the piece. Typically you achieve this through both pictures and notations (Picture 5). Notice how each element is defined. Notations are made on how the eyelets are wrapped in with the other border wires.

Picture 5

To finish the design you must look at the basic elements that were added first. Do they still work in their current position? A few adjustments may need to be made before you can say the job is done (Picture 6). Take a few minutes to tweak the design until you’re satisfied with the results.
Picture 6

The point of this exercise is to show you how easy it is to make simple changes to basic designs to come up with a fresh approach to your work.  From this first drawing you can create an entire line of pendants that have the same design thread running through them. Add an element here and there to create something new and appealing to your customers.
The Finished Design
Trust me, the seemingly long journey of creating fresh work isn’t as daunting as it may seem. It all begins by taking that first step. 
  
For More Jewelry Tips, Information and Projects, Visit Us Online

Monday, February 4, 2013

How To...Remove a Stone From a Project

For More Jewelry Tips, Information and Projects, Visit Us Online

 
Over the years we’ve received a lot of emails asking how to remove a stone so the piece can be polished or heat hardened. In many cases leaving the stone in the piece while performing these procedures will cause damage to the stone. So how can you safely remove the stone from a finished piece.
Solution – The cabochon must be removed in such a way that it causes the least amount of damage. Removing the cab from the front may cause irreparable damage to the piece. Removing the stone from the back of the piece, however, will hide any damage that occurs.

Using flat nose pliers, grab the bottom of the backing wire at the point where it bends away from the frame wires (Picture 1).
Picture 1
 
Gently bend the wire away from the stone (Picture 2).
Picture 2
 
Do the same with the top of the same wire (Picture 3).
Picture 3
 
You should now have one side of the stone exposed (Picture 4). Do the same with the second backing wire.
Picture 4
 
At this point the backing wires should look like open shutters (Picture 5). From the front of the piece push the stone out the back.
Picture 5
 
Now you are free to perform whatever necessary procedures that you wish (Picture 6).
Picture 6
 
When you’re ready to reinstall the stone push it into the piece from the back. With flat nose pliers bend the backing wires back into place against the stone (Picture 7).
Picture 7
 
To get the wires snug against the stone tap the wires with a rawhide mallet (Picture 8). Be careful not to cause any damage to the stone or the front of the piece.
Picture 8

Please keep in mind that this procedure can only be done to the piece once. The more you bend the backing wires the weaker they become.  The last thing that you need is to grab one of the backing wires and have it snap away from the piece.
If you have a problem that you would like answered, let us know - wirearted@gmail.com

For More Jewelry Tips, Information and Projects, Visit Us Online